Install the in.touch 3 CO (Spa) module
Last updated 2 months ago
Overview
The CO module is the spa-side part of the in.touch 3 system. It connects directly to your spa’s Gecko control pack and communicates wirelessly with the EN module inside your home.
Follow these steps to install it safely and ensure a strong connection between your spa and your network.
Before you begin
Make sure power to the spa is turned OFF at the breaker before installation.
Verify that your spa control pack is compatible (in.yj, in.ye, or in.yt — version 2 or higher).
Have a screwdriver
Step 1: Power off your spa
Turn off the main power at the spa’s electrical panel or breaker before touching any cables or ports. This ensures safe installation and prevents accidental short circuits.
Step 2: Locate the control pack and CO port
Find your Gecko control system inside the spa cabinet (models may vary).
Locate an available CO port on the control pack — this is where you’ll connect the CO module.
On in.yj systems, the port is typically near the communication connectors.
On in.ye or in.yt systems, the CO ports are grouped together and clearly labeled “CO.”
Step 3: Mount the CO module under the spa
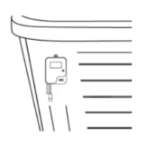
Install the CO module under the spa skirt, as high as possible and facing toward your home router for the best signal.
Keep it at least 12 in (30 cm) away from any metal surfaces or foil insulation.
Secure it with a #8 screw, leaving a small amount of cable slack so the unit can be repositioned later if needed.
Optimize signal and placement
Proper placement of the CO module is critical for reliable communication with the EN module.
Mount above ground level
Install the CO module as high as reasonably possible inside the equipment bay. Avoid placing it directly on the ground or on the bottom pan, as elevation improves signal performance.Keep away from metal components
Avoid placing the module near pumps, heaters, metal frames, or metallic cabinet panels. Metal can interfere with the wireless signal and reduce range.Avoid foil insulation barriers
If your spa includes foil-backed insulation, position the module where the signal can exit the cabinet without passing through it. Foil materials can block wireless communication.Install on the house-facing side
Place the CO module on the side of the spa that faces your home, where the EN module is installed. Fewer obstacles between modules improves connection stability.
Step 4: Connect the CO module

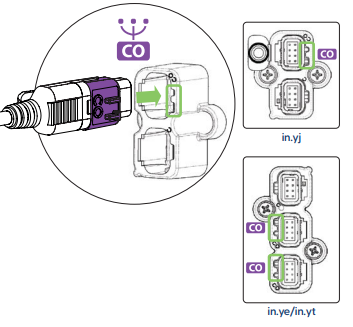
Plug the CO module cable into the available CO port on the control pack.
You may need to open the control box cover to access the port, depending on your spa model.
Secure the connection firmly, ensuring the plug is seated correctly.
For in.touch 3+ users:
Plug the Gecko waterlab probe cable connector into the short cable attached to the CO module (this enables water monitoring).
Step 5: Restore power
Once the CO module is installed and connected:
Restore power to your spa by flipping the breaker ON.
Wait for the LED indicator on the CO module to light up — this confirms it is powered and ready to communicate with the EN module.
Continue with the EN module installation steps.
Step 6: Verify operation
After both modules are powered:
The CO module LED should show a solid blue light when it’s paired and communicating correctly with the EN module.
If it’s blinking or another color, refer to the LED status guide in the troubleshooting section.
Important installation notes
Do not install the module near high heat sources.
Maintain a clear line of sight between the spa and the area of your home where the EN module will be installed when possible.
Avoid wrapping the cable tightly or running it near high-voltage lines.